Slicing Your Data with Collections Published on by luis in Documentation
You can’t manage your microstock business if you do not have a clear view on your sales. That’s the premise on which Stock Performer is based. And to achieve that goal, slicing your data is important.
I want to share with you how I group my pictures and what insight that brings me. Let me state upfront that all data in this article was produced by Stock Performer on my own sales as an exclusive photographer on iStockphoto: user name „alvarez“. These ideas should be interesting for other Stock Performer users.
Why slice your images?
There are various reasons why you want to slice and group your images. This is how I slice my pictures:
- Slice per Photoshooting: A photoshooting involves an investement, both in time and in money. So you want to know if it was worth it. Did you cover your costs? How much money did the photoshoot bring you?
- Slice per Themes: Everybody has strengths and weaknesses. What are yours? If you group by themes, you can see which images are doing better. Are your isolated on white images doing good? How about your landscapes? And how do you compare your mixed ethnicity pictures to the non-mixed ethnicity shots?
- Slice per Price Point: At iStockphoto, images sell at different price points. Vetta and Agency sell for a lot. Exclusive+ and Photo+ command a small premium and then you have the regular prices. If you know how much such images bring, you can decide beforehand if your productions should be oriented at a specific price point.
- Slice per Year: Are you getting better? Are you more competitive? Group your images by the year you produced them and compare if your 2011 images are better than your 2010 images.
Once you slice your images and get the big picture then it’s much easier to focus your productions on what sells. The added benefit is that you also discover what the lifecycle of your images are. Some images tend to be steady sellers whereas others are shooting stars and then dissapear in the horizon. What type is best for you?
How to understand Stock Performer collections
Creating collections with Stock Performer is easy. It automatically downloads your lightboxes from your microstock agency. You can use the powerful search engine of your agency to create all types of lightboxes and then let Stock Performer import it. We will give some tips in the following text.
Stock Performer presents you with the following important metrics for each collection:

- Assets: Indicates the number of files in the collection. These can be photos, videos, illustrations, etc…
- Downloads (DLs): The total number of downloads (i.e. sales) this collection has made.
- Revenue: The total number of money this collection has generated. The more the better!
- Revenue per Download (RPD): The average amount of money you made per sale. The higher this value, the larger the size these files sell. From my experience, landscape and architecture files sell with a higher RPD than isolated on white pictures. Generally because customers buy large size for landscapes (for print) and buy small size for isolated images (usually for web). What is your experience?
- Revenue per Image: The average amount of money each image makes per month. This is a very important value to compare collections. If one collection has 100 images, but each make $1 a month (RPI = $1), then you will earn $100 a month. If another collection has 10 images, each making $5 dollars a month (RPI = $5), then you might have a lower revenue, only $50 a month, but the images are much more powerful and you should produce more of them! Use this to learn which collections and images are your top earners.
- Sell Through Rate (STR): The percentage of files which have at least one sale. The more attractive a collection is, the faster your images will start selling and the higher your STR. Good collections quickly gain high STR values.
Let’s look at some examples
Slice by Photoshoot
I’ve been very disciplined in organizing my images. I really benefit from the added oversight. Here is a screenshot of all my 2011 photoshootings:
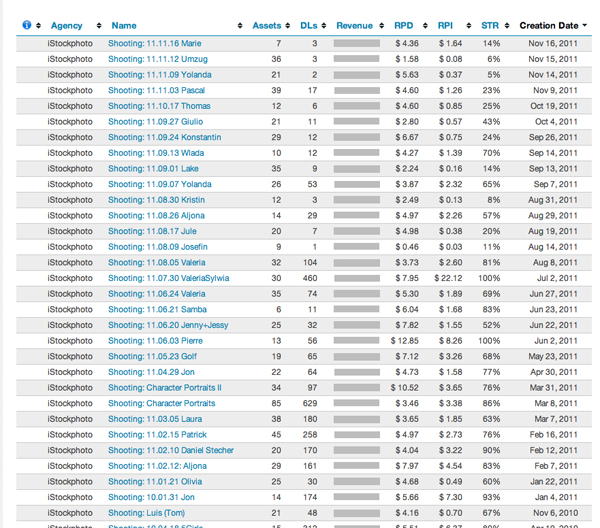
Thanks to this overview I can see in an instant if a photoshooting is successful or a flop. If I see a collection selling well, then I will produce more images of that style. If a collection is a flop, then I learnt my lesson!
How to create a photoshoot lightbox on iStockphoto
Creating a photo shoot Lightbox on iStockphoto is fairly simple. Create the lightbox in the lightbox manager and add all the photoshooting’s images to it. Don’t forget to download your collection into Stock Performer’s collections.
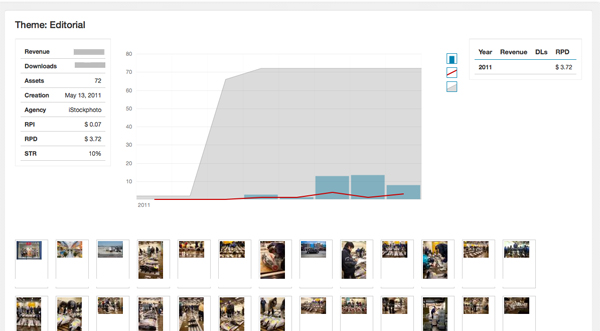
Slice by Themes
I know what my strengths are, but I also like exploring other types of photography. My main income comes from my glamour images, but I do produce architecture, commercial and travel photos. How do these compare? Should I continue working on them?
You can also group by a specific model. Select all images of a model, create a lightbox and import into Stock Performer.
Let me show you two of my examples:
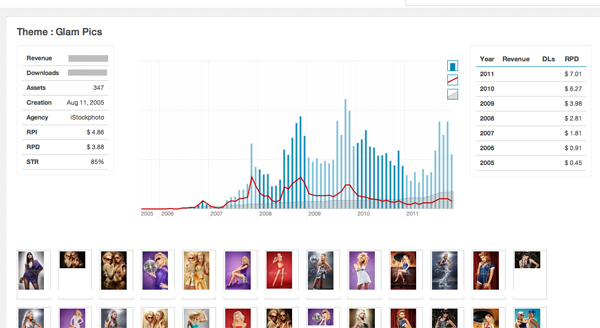
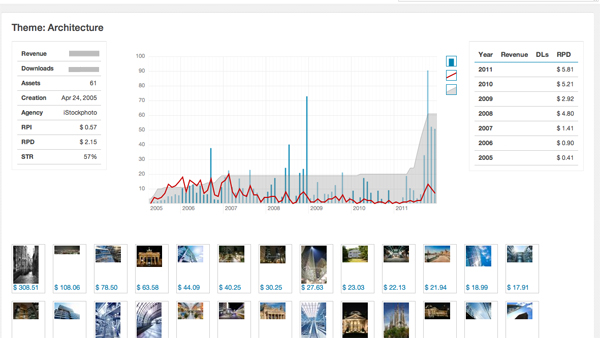
My glamour pictures make the bulk of my income. Despite being only 347 images out of my approximate 2000 images, they accounted for 41% of my income in November. An average RPI of almost $5 during the past 5 years is excellent! My architecture photos manage an RPI of $0,57. I know photographers doing a great job in that area, so my poor numbers only reflect my skill.
Here are some ideas of things you can track:
- Studio shots vs. outdoors shots.
- Isolated on white vs. not isolated on white.
- People images vs. non-people images.
- Fashion vs. Commercial imagery.
- Nature Landscape vs. Urban Images.
The amount of possibilities is endless!
How to create a Theme lightbox on iStockphoto
Creating a lightbox based on a theme is easy. Open your portfolio view on iStockphoto. Use the “Narrow Your Results” search field on the left to find all images in your portfolio matching a specific set of keywords. For example: “Isolated on white”. Once you have all your images go to the bottom of your search results and you will see the option “Lightbox: Add”. Click on it and add it to a lightbox or create a new one.
You can then import the lightbox into Stock Performer and voilà! You can track all images matching those keywords!
Slice by Price Point
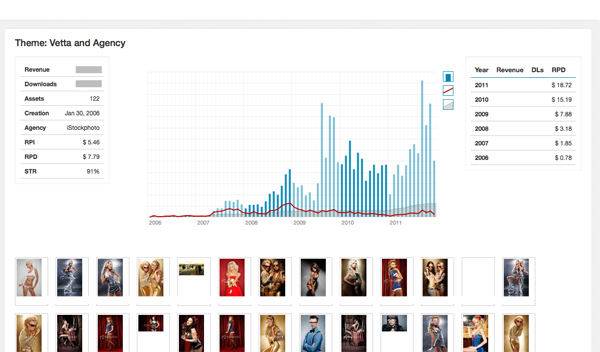
Our Stock Performer users ask us how to track their Vetta images. Or their Exclusive+ or Editorial images. That is actually quite easy if you use iStockphoto’s new Price Range filter.
Thanks to Stock Performer’s collections I know that Vetta images are only 5% of my portfolio but make about 35% of my income! That guides my production to produce as much Vetta as I can! Exclusive+ is also doing very well. Editorial is not.
How to create a Price Point lightbox on iStockphoto
Go to your portfolio view and use the new Price Range filter to select only your Photo+, Exclusive+, Vetta, Agency or Editorial images. Your portfolio will be filtered and you can then add all the resulting images into one lightbox by using the option “Lightbox: Add” found at the bottom of the search results.
Slice by Year
I like grouping my images into years. Like that I know if I’m becoming a better photographer. If my 2011 images sell better than my 2010, then that’s good! I also want to know how many images I upload per year. I compare the RPI values and can evaluate my progress. You can also see if your older images are still selling or if images uploaded on a specific year have reached their end of life. Check my chart:
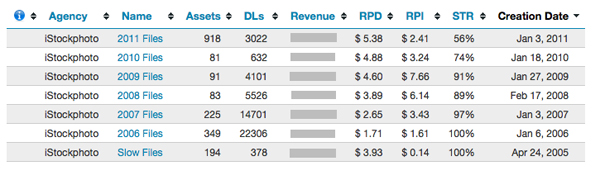
The chart shows you that I produced a lot of images in 2011. 918 to be exact! That’s 10 times more than in 2010 and 2009. Nevertheless, the RPI of my 2009 images is really high. They must be very attractive image for customers!
How to create a Year lightbox on iStockphoto
The iStockphoto portfolio view shows you 20,30,50,100 and 200 images of your portfolio on one page. You can navigate back and forth and as you do so, simply add all images into your yearly lightboxes with the “Lightbox: Add”. You might need to remove or add a few separately but it’s a quick process.
That’s it for an overview of Stock Performer’s collections. There is quite a lot you can do, all with the goal of gaining clarity and seeing the big picture. Once you are there, deciding what to produce next is much much easier!